

 Manufacturers
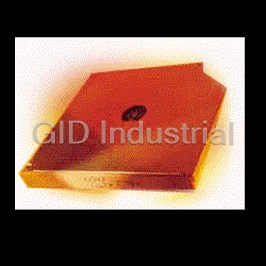
TOSHIBA SD-M1711
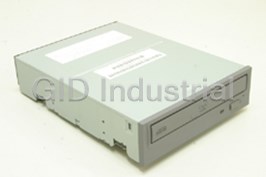
Description
Toshiba SD-M1711 - DVD-ROM SCSI Drive
Part Number
SD-M1711
Price
Request Quote
Manufacturer
TOSHIBA
Lead Time
Request Quote
Category
PRODUCTS - S
Specifications
Average Random Access 95ms (DVD)
85ms (CD), 170ms (DVD-RAM)
Average Random Seek 85ms (DVD)
80ms (CD), 130ms (DVD-RAM)
Burst (SCSI Interface) Transfer Rate
20MB/s (Sync), 5MB/s (Async)
Dimensions
5.75" x 1.6" x 7.6" (146mm x 41.5mm x 193mm)
Full Stroke 200ms (DVD)
180ms (CD), 300ms (DVD-RAM)
Sustained Data Transfer Rate 6,750 - 16,200 KByte/s (DVD)
5,540 - 13,500 KByte/s (DVD dual layer), 3,105 - 7,200 KByte/s (CD - mode 1), 3,541 - 8,212 KByte/s (CD - mode 2),
Weight
2.18lbs (0.99kg)
Features
- 3-way Disc Eject (eject button, software, emergency eject hole)
- DAE (Digital Audio Extraction) Audio Capability
- Headphone Output Volume Control
- MPC3 Compatibility
- Multi-Read Capability
- Regionalization (RPC2 compliance) (DVD)
- Tray Loading Mechanism
Datasheet

Extracted Text
TOSHIBA AMERICA INFORMATION SYSTEMS STORAGE DEVICE DIVISION IRVINE, CALIFORNIA SD-M1711 DVD-ROM SCSI DRIVE USER MANUAL CONTENTS Introduction..............................................................................1 Setup ........................................................................................3 Using the DVD-ROM Drive ......................................................7 Troubleshooting.....................................................................10 Specifications ........................................................................11 Drive Connectors...................................................................15 INTRODUCTION – SD-M1711 DVD-ROM Drive General Features Tray Loading Mechanism 3-way Disc Eject (eject button, software, emergency eject hole) Average Random Access Time CD-ROM 85ms DVD 105ms DVD-RAM 170ms DAE (Digital Audio Extraction) Audio Capability MPC3 Compatibility Headphone Output Volume Control Multi-Read Capability Regionalization (RPC2 compliance) (DVD) SCSI BUS Interface: Types of Disc Formats Supported DVD • DVD-ROM DVD-5 - Single-sided/Single Layer DVD-9 - Single-sided/Dual Layer DVD-10 - Double-sided/Single Layer DVD-18 - Double-sided/Dual Layer • DVD-R, DVD-RW 1 CD • CD-DA • CD+(E)G • CD-MIDI • CD-TEXT • CD-ROM • CD-ROM-XA • CD-I Bridge (Photo-CD, Video CD) • CD-I • Multi-session (Photo-CD, CD Extra, CD-RW, CD-R) • CD-R (Read) • CD-RW (Read) Front Panel Figure 1.SD-M1711 DVD-ROM Drive Front Panel Load disc using tray. Loading Tray Busy Indicator When you install a disc into the DVD-ROM drive, the BUSY light flashes slowly as it attempts to locate the disc. One of the following will occur: • BUSY light goes out. The DVD-ROM drive is ready to read data from the disc. • BUSY light flashes slowly. The disc may be dirty. • BUSY light remains ON. The DVD-ROM is accessing data. • BUSY light remains ON indefinitely. The DVD-ROM is experiencing an error Eject The Eject button is used to open the disc tray so you can install or remove a disc. Button The emergency eject hole is to be used only when the Loading Tray will not open when Emergency Eject button is pressed. Eject Hole SETUP – SD-M1711 DVD-ROM The following steps must be performed to properly install your drive: • Set DVD-ROM Drive Jumper Settings: SCSI ID, Parity, Termination, 512/2K, Power • Connect Audio Cable • Attach SCSI Interface Cable • Attach Power Cable • Daisy-Chaining SCSI Drives (if applicable) • Mount Drive Jumper Settings A block of mode select jumpers are located on the rear of the DVD-ROM. If a jumper covers both pins on the jumper block, it is ON; if there is no jumper or only one of the pins is covered, the jumper is OFF. The jumper settings include SCSI ID, Parity, Termination, Block Selectability, Test and Power Supply. Figure 2. Jumper Block Figure 1. Jumper Location SCSI ID - All SCSI devices attached to your computer are assigned a SCSI-ID number from 0 to 7. Your DVD-ROMs SCSI ID must be set so that its ID number does not conflict with any other devices SCSI-ID in your system. In most cases, your DVD- ROM will be set to SCSI ID 4 at the factory. Also note that your SCSI interface card in most cases has a SCSI ID of 7. This following chart (figure 3) shows the jumper settings for the eight possible ID numbers Figure 3. SCSI ID Examples Parity - In the OFF mode, the parity bit check function on the SCSI data bus is activated which enhances data bus reliability. Therefore, the jumper should remain in the OFF mode. 3 Terminator ON/OFF - This jumper turns termination power ON or OFF. If you are connecting more than one SCSI device to your system, and the DVD-ROM is not at the end of the chain, then terminator jumper is not required. 512/2K (Block Size Selectability) - This jumper is used to select default block size. When the jumper is present, the default block size equals 512Bytes, when the jumper is not present, the default block size is 2048Bytes. This is effective for CD media only, not DVD media. Test - This setting selects the drive operation between normal CD-ROM and CD-Audio player mode. When jumper is set to ON position, commands from the host computer are ignored. This jumper is for test purposes only and should be set to OFF for proper CD-ROM function. Power Supply - Toshiba SCSI DVD-ROM drives can supply power to other equipment on the SCSI BUS. When the jumper is ON, the drive will supply termination power. If you are not sure if any other device supplies termination power, it is fine to leave the jumper ON. Placing DVD-ROM Drive inside your Computer Now that you have set the jumpers, you are ready to install your DVD-ROM drive inside your computer. Important Note: Disconnect power from your computer system before beginning installation. Remove computer cover and faceplate if required. Refer to your computer systems manual for removal information. If the DVD-ROM drive is replacing a CD-ROM or DVD-ROM, remove drive presently installed in your system. Your Toshiba DVD-ROM drive can be placed in any free half-height drive slot at the front of your computer. (It can be mounted horizontally or vertically.) Carefully start sliding the DVD-ROM drive into the opening with the disc tray facing the front of the computer. Before you push the drive all the way in you will need to connect the IDE BUS cable, Audio cable and the Power cable on the back of the drive. Connecting Cables SCSI Interface Cable (not supplied with drive) - The internal SCSI interface cable is connect to your SCSI host adapter card and fits into the socket on the back of your DVD-ROM. The stripe or red-colored side of the ribbon cable connects to pin 1 of the drive's SCSI connector which is found next to the drive's power connector. Carefully push the SCSI connector into the socket, making sure it fits snugly Power Cable - Connect an internal computer power supply cable to the power socket at the back of the DVD- ROM drive. One side of the plug has chamfered edges, so the power connector fits only one way. Push plug completely into the socket making sure the plug fits correctly. Figure 4.Installing Power Cable 4 Audio Cable (optional) - If you have a sound card and speakers, and would like to play audio CDs on your computer, you will need to install a CD/DVD audio cable. Toshiba's DVD-ROM drives use a standard 4-pin audio cable that can be purchased from most local computer suppliers. The sound cable connects to your sound card at one end and the other end connects to the digital audio connector at the left rear of the DVD-ROM drive (see DVD-ROM drive Back Panel photo for location). Refer to the instructions that came with your sound card for details on any sound-driver software required. Figure 5.Installing Audio Cable Daisy-Chaining - If the DVD-ROM you are installing is one of two or more SCSI devices you are connecting to your system, you will need to use a custom built SCSI interface cable. Remember that the terminator jumper on the DVD-ROM drive must have the jumper installed when the drive is the last device in the chain. Figure 6. Daisy-Chaining Multiple Drives 5 Completing Installation After you have connected all the necessary cables, push the DVD-ROM drive completely into the computers drive slot. Mount drive per your computers instructions. The screw length should not exceed 30.5mm (measured from outside surface of side or bottom of drive to tip of screw). Replace computer cover and all outer screws. Figure 7.Mounting Illustration Software Driver - Toshiba's optical drives do not require any unique device drivers for Windows '95/'98/2000/Me/XP/NT. After installing your drive and re-booting, your system should recognize your drive. Windows '95/'98/2000/Me/XP/NT Operating Systems support all Toshiba optical drives natively If you prefer using DOS, download the DOS ATAPI driver from our web site. 6 USING THE DVD DVD-ROM Drive – SD-M1711 Drive Operation Inserting a Disc - Horizontally To insert a disc into a drive that is mounted horizontally, perform the following steps: Figure 1.Inserting Disc 1. Open the drive's Loading tray by pressing the Eject Button. 2. Place disc into drive's Loading tray 3. Press Eject button again or gently push on the open disc tray. Tray will automatically close. Inserting a Disc - Vertically To insert a disc in a drive that is mounted vertically, perform the following steps: 1. Locate sliding disc holders (4 locations) on drive's Loading Tray. 2. Position the disc behind the disc holders 3. Close the drive by gently pushing in the tray or pressing the eject button. Figure 2.Inserting Disc Vertically 7 Removing a Disc To remove a disc from the DVD-ROM drive, perform the following steps: 1. Open the Loading Tray by pressing the Eject Button. 2. Grasp disc by edges, and lift out of loading tray. 3. Press Eject Button again to close Loading Tray. Usage Guidelines • Keep the disc tray closed when not using the DVD-ROM Drive. • Do not press down on the disc tray when opening or closing it. • Do not place objects on the disc tray. • Never use a damaged, broken, or deformed disc. • Do not press the Open/Close button while the drive is playing a DVD movie or accessing a disc. To stop a DVD movie, click Stop button in the DVD player application program. NOTE: High-speed drives spin the disc at a high rotational speed. If a disc has printing on only half of the disc, or if there is a slight imbalance in the disc, the imbalance is greatly magnified by the high speed, causing the drive to vibrate or produce a fan-like noise. These effects are inherent in the high-speed technology and do not indicate a problem with the drive. Emergency Ejection CAUTION: The following procedure is intended only as a last resort when pressing the eject button fails to open the Loading Tray 1. Turn computer power OFF by properly shutting down system. 2. Insert a solid bar (i.e. large paper clip) into Emergency Eject hole and push as shown in the picture below 3. DVD tray will open/eject. Figure 3.Using Emergency Eject This procedure cannot be repeated without cycling the DVD-ROMs (computer's) power. After the media is removed and the loading tray is closed, the tray will not reopen without first turning the power ON/OFF. NOTE: Use a bar that is less than 1.5 mm in diameter. Do not insert more than 50mm in depth. Inserting more than 50mm may damage the DVD-ROM drive. 8 Handling Media DVD media is sensitive to dust and fingerprints. Carefully handle media by its edges only. If a DVD movie skips or hangs during playback, clean the media. Most DVD video playback issues are media-related and can be remedied by proper handling and care of media. Cleaning Media Try to avoid touching the read area (underside) of the disc as dirt and smears will degrade the disc accessing speed. If the disc becomes dirty wipe it with a damp soft cloth. Avoid cleaning in a circular motion, but rather from the inner side outward. 9 TROUBLESHOOTING – SD-M1711 Problem Solution Disc tray cannot be opened • Check that there is power to drive. • Use Emergency Eject instructions to open tray. Drive is not recognized by system • Is the drive connected properly? Are all cables plugged in properly (e.g. Power Cable, Interface Cable and Audio Cables). • Are the drive configuration jumpers on the DVD-ROM drive set properly? • Check to see that there is no SCSI ID conflict with another SCSI device connected to your system • Is the SCSI host adapter software driver loaded? On a step-by-step (F8) Boot of the system is the DVD-ROM recognized? (BIOS / DOS reports "device driver not found" or "no valid DVD-ROM drivers selected."). If not, Contact you SCSI host adapter manufacturer. • Has the DVD-ROM drive software driver been corrupted by a virus. Run a Virus Scan program and repair if possible. Contact Technical Support if the Virus renders the DVD-ROM drive software drivers not useable. Drive is not recognized by system • Is the SCSI host adapter software driver loaded? On a step-by-step during Boot process, but is (F8) Boot of the system is the DVD-ROM recognized? recognized by the Operating (BIOS / DOS reports "device driver not found" or "no valid DVD-ROM System (i.e. XP, Win2000, Win98, drivers selected."). If not, Contact you SCSI host adapter manufacturer. Win NT, etc.) • Has the Windows DVD-ROM SCSI host adapter driver program been corrupted by a virus. Run a Virus Scan program and repair if possible. Contact you SCSI host adapter manufacturer if the Virus renders the software driver not useable. BUSY Indicator LED flashes • The disc may be dirty Clean it with a soft damp cloth. Avoid cleaning the slowly disc using a circular motion. The disc should be wiped in a radial direction. That is, from the inner side outward. • The laser lens may have become cloudy or blocked by particulate matter. Please contact Technical Support. BUSY Indicator LED is constantly • Possible Hardware Problem. Please contact Technical Support. ON DVD-ROM can not play a DVD in • Is the SCSI host adapter driver loaded the drive or certain types of CD • Is the DVD disc the correct format for the type of system that you are media (i.e. CD-plus, etc.) using? (i.e. on a PC an ISO9660 IBM compatible PC format as opposed to Apple/Mac HFS disc or UNIX disc formats which will not function). • Do you have the correct software applications program/drivers installed to run a DVD disc? • Has the Windows DVD-ROM drive software driver program been corrupted by a virus. Run a Virus Scan program and repair if possible. Contact Technical Support if the Virus renders the software drivers not useable. 10 SPECIFICATIONS –SD-M1711 General Interface SCSI Compatible DVD-ROM Standards DVD DVD-ROM (DVD-5, DVD-9, DVD-10, DVD-18) DVD-R, DVD-RW, DVD-RAM CD CD-DA CD-ROM CD-I Bridge (Photo-CD, Video CD) Multi-session (Photo-CD, CD Extra, CD-RW, CD-R) CD-MINI CD-TEXT CD+(E)G CD-ROM-XA CD-I CD-R (Read) CD-RW (Read) Storage Capacities DVD 4.377GB (DVD-5) 7.959GB (DVD-9) 8.754GB (DVD-10) 15.917GB (DVD-18) 3.679GB (DVD-R, Ver. 1.0) 4.377GB (DVD-R, Ver. 2.0) 2.324GB (DVD-RAM, Ver 1.0) 4.377GB (DVD-RAM, Ver 2.1) CD 656.5MB (mode 1) 748.8MB (mode 2) Performance Rotational Speed DVD-ROM single layer 6,900rpm (5X - 12X) dual layer 6,300rpm (4.1X - 10X) DVD-R/-RW (Ver 2.0) 2,780rpm (2 - 4.8X) DVD-R (Ver 1.0) 3,200rpm (2 - 4.8X) DVD-RAM (Ver 1.0) 2,160 - 4,800rpm (2X) DVD-Video CSS-disc 2,780rpm (2 - 4.8X) CD-ROM, CD-R/RW 9,500rpm (20.7 - 48X) CD-DA Transfer 1,800 - 4,300rpm (14 - 32X) CD-DA/Video CD 1,200 - 2,000rpm (4X - 7.8X) 11 Data Transfer Rate DVD (Single) 6,750 – 16,200 KBytes/s DVD (Dual) 5,540 - 13,500 KBytes/s DVD-Video 2,704 – 6,536 KBytes/s DVD-R, DVD-RW 2,704 – 6,536 KBytes/s DVD-RAM ( Ver 1.0) 2,704 KBytes/s CD (mode 1) 3,105 – 7,200 KBytes/s CD-(mode 2) 3,541 – 8,212 KBytes/s Burst (SCSI Interface) Sync 20 MByte/s Async 5 MBytes/s Random Access Time CD 95ms DVD 85ms DVD-RAM 170ms Data Error Rate -15 DVD 10 Max -15 CD 10 Max (Mode 1) -12 10 Max (Mode 2) Spin-up Time DVD 1.5s Typ DVD-RAM (Ver 2.1) 1.5s Typ CD 1.4s Typ Data Buffer 192Kbytes Reliability MTBF 100,000 hours Power ON Hours 5,436 hours/year ON/OFF Cycles 313 cycles/yea Number of Access 600,000 accesses/year Operating Duty Cycle 20% of Power ON time (Reading/Seeking) MTTR 0.5 hours Audio Number of Channels 2 Frequency Response 20Hz to 20,000 Hz Distortion -80 dB (at 1kHz JIS A-weighted) Output Levels Headphone 0.79V (rms Typ) 12 Environmental Ambient Temperature Operating 5° to 50° C (41° to 122° F) Storage -10° to 60° C (-14° to 140° F) Shipping -40° to 65° C (-40° to 149° F) Temperature Gradient Operating 11° C/hour (max) Storage/Shipping 20° C/hour (max) Relative Humidity Operating 8% to 80% Storage/Shipping 5% to 95% (wet bulb 27 C max) Vibration 2 Operating no hard error: 10 to 500 Hz 2.45 m/s [0.25G] (O-P) (excludes resonance point) Non-operating no damage: 5 - 10Hz 5mm (P-P) 2 10 - 500Hz 9.8m/s [1G] (O-P) 2 Shock (Non-operating) 490 m/s [50G] (Half sine wave 11ms) Acoustical Noise <45dB Power DC Voltage and Current Requirements 5V 5%, 12V 5% +5V +5V Idle (Laser ON, Motor ON) 470mA (DVD) 110mA (DVD) 490mA (CD) 110mA (CD) Continuous Read (Data/Audio) 800mA (DVD) 660mA (DVD) 850mA (CD) 760mA (CD) Standby (Laser OFF, Motor OFF) 300mA (DVD/CD) 0mA (DVD) Random Access (average) 710mA (DVD) 680mA (DVD) 720mA (CD) 780mA (CD) Physical Height 5.75" (146mm) Width 1.6" (41.5mm) Depth 7.6" (193mm) Weight 2.18lbs (.95kg) Connectors DC input AMP 1-480424-0 or equivalent IDE Interface Connector 50 Pin SCSI (core type) Analog Audio Line Output Connector 3 Pin Audio Connector 13 Lasers CD Laser Type Semiconductor Laser and 3-beam System Wave Length 770 - 795 nm DVD Laser Type Semiconductor Laser and 1-beam System Wave Length 770 - 650 nm Regulatory The SD-M1711 DVD-ROM drive has been certified by the following regulatory agencies: • UL 1950 • CSA C22.2 No. 950 • TUV (EN60950I) • CE standard • CB • DHHS 21 CFR Sub-Chapter J 14 DRIVE CONNECTORS –SD-M1711 Figure 1.SD-M1711 DVD-ROM Drive Rear Panel - Connectors Power Power is supplied to your DVD-ROM drive by the connection with your computer's +5V/+12V power cable to the power socket at the back of drive. One side of the plug has Connector chamfered edges, so the power connector fits only one way CAUTION: Severe damage to the Drive circuits may occur if power cable is plugged in upside-down with power ON Audio Supplies Analog sound to your system Connectors SCSI The SD-M1711 DVD drive is connected to your computer system through the SCSI Connector connector. 15 Table 1.Interface Pin Assignments PIN SIGNAL NAME PIN SIGNAL NAME NO. NO 1 GND 2 -DB0 3 GND 4 -DB1 5 GND 6 -DB2 7 GND 8 -DB3 9 GND 10 -DB4 11 GND 12 -DB5 13 GND 14 -DB6 15 GND 16 -DB7 17 GND 18 -DBP 19 GND 20 GND 21 GND 22 GND 23 GND 24 GND 25 NO CONNECTION 26 TERM POWER (+5v) 27 GND 28 GND 29 GND 30 GND 31 GND 32 -ATN 33 GND 34 GND 35 GND 36 -BSY 37 GND 38 -ACK 39 GND 40 -RST 41 GND 42 -MSG 43 GND 44 -SEL 45 GND 46 -C/D 47 GND 48 -REQ 49 GND 50 -I/O 16
Frequently asked questions
What makes Elite.Parts unique?

What kind of warranty will the SD-M1711 have?
Which carriers does Elite.Parts work with?
Will Elite.Parts sell to me even though I live outside the USA?
I have a preferred payment method. Will Elite.Parts accept it?
Why buy from GID?

Quality
We are industry veterans who take pride in our work

Protection
Avoid the dangers of risky trading in the gray market

Access
Our network of suppliers is ready and at your disposal

Savings
Maintain legacy systems to prevent costly downtime

Speed
Time is of the essence, and we are respectful of yours
Related Products
Toshiba S9-PBR-2007-LD Motor Controller - Resistor Dynamic Braking
MEMORY CARD 512MB SECURE DIGITAL
Toshiba SM128S8S816-75-OP8Y Memory Modules-128MB 144p PC133 CL3 8c 8x16 SDRAM SODIMM
Request a Quote

The quote request has been received
Close

Facing challenges or have inquiries? Feel free to contact us!
Call Us +1-469-283-2440
What they say about us
FANTASTIC RESOURCE
One of our top priorities is maintaining our business with precision, and we are constantly looking for affiliates that can help us achieve our goal. With the aid of GID Industrial, our obsolete product management has never been more efficient. They have been a great resource to our company, and have quickly become a go-to supplier on our list!
Bucher Emhart Glass
EXCELLENT SERVICE
With our strict fundamentals and high expectations, we were surprised when we came across GID Industrial and their competitive pricing. When we approached them with our issue, they were incredibly confident in being able to provide us with a seamless solution at the best price for us. GID Industrial quickly understood our needs and provided us with excellent service, as well as fully tested product to ensure what we received would be the right fit for our company.
Fuji
HARD TO FIND A BETTER PROVIDER
Our company provides services to aid in the manufacture of technological products, such as semiconductors and flat panel displays, and often searching for distributors of obsolete product we require can waste time and money. Finding GID Industrial proved to be a great asset to our company, with cost effective solutions and superior knowledge on all of their materials, it’d be hard to find a better provider of obsolete or hard to find products.
Applied Materials
CONSISTENTLY DELIVERS QUALITY SOLUTIONS
Over the years, the equipment used in our company becomes discontinued, but they’re still of great use to us and our customers. Once these products are no longer available through the manufacturer, finding a reliable, quick supplier is a necessity, and luckily for us, GID Industrial has provided the most trustworthy, quality solutions to our obsolete component needs.
Nidec Vamco
TERRIFIC RESOURCE
This company has been a terrific help to us (I work for Trican Well Service) in sourcing the Micron Ram Memory we needed for our Siemens computers. Great service! And great pricing! I know when the product is shipping and when it will arrive, all the way through the ordering process.
Trican Well Service
GO TO SOURCE
When I can't find an obsolete part, I first call GID and they'll come up with my parts every time. Great customer service and follow up as well. Scott emails me from time to time to touch base and see if we're having trouble finding something.....which is often with our 25 yr old equipment.
ConAgra Foods