

 Manufacturers
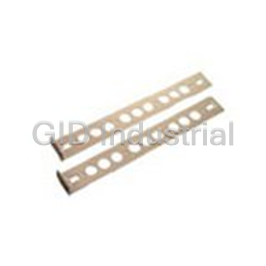
PARAGON RUMT-1U-LM304
Description
Paragon RUMT-1U-LM304 Rack-mount - rackmount kit, stacking unit
Part Number
RUMT-1U-LM304
Price
Request Quote
Manufacturer
PARAGON
Lead Time
Request Quote
Category
PRODUCTS - R
Specifications
Description
Rack mounting kit
Height (Rack Units)
1U
Rack Size
19"
Datasheet

Extracted Text
Paragon® II Quick Setup Guide Thanks you for your purchase of the Paragon II. This Quick Setup Guide explains how to install and configure the Paragon II. For additional information on any aspect of the Paragon II, see the accompanying Paragon II User Guide, which can be downloaded from the Firmware and Documentation section (http://www.raritan.com/support/firmware-and-documentation/) of Raritan's website. Note: The Ethernet port on the Paragon switch is hard coded (not configurable) and supports only 10-BaseT/half duplex. Paragon II covers 4 basic types of devices: Main Switching Unit (Main Unit) Stacking Unit Models: P2‐UMT242, P2‐UMT442, P2‐UMT832M, P2‐UMT1664M Models: P2‐UMT832S, P2‐UMT1664S User Station Computer Interface Module (CIM) Models: P2‐UST, P2‐EUST, P2‐EUST/C Models: P2CIM‐APS2, P2CIM‐AUSB, P2CIM‐ASUN, and more Package Contents • Cat5 admin cable x 1 • Quick Setup Guide x 1 Paragon Main Unit (P2-UMT242, P2-UMT442, P2-UMT832M, or P2-UMT1664M): • Main Unit x 1 Paragon Stacking Unit: • 20-ft. (6.1-m) Cat5 test cable x 2 • Stacking Unit x 1 • 6-ft. (1.8-m) AC power cord x 1 • RUMT-1U-LM304 or RUMT-2U-LM304 rackmount kit x 1 • Rackmount kit x 1 (including brackets and associated screws) Paragon II QSG 1 QSG-P2-0K-v4.6-E y 255-30-6010-00 • 6" stacking cable(s)--the number of cables vary depending Front rackmount of a Paragon switch on the model you purchased P2-UMT832S: Stacking cable x 1 P2-UMT1664S: Stacking cable x 2 • AC power cord x 1 Paragon user station (P2-UST, P2-EUST or P2-EUST/C): • User-station module x 1 • 6-ft. (1.8-m) AC power cord x 1 • 6-ft. (1.8-m) AC power-extension cord for the connected monitor x 1 • 16.4-ft. (5-m) DB9 male-to-female serial administration cable x 1 Paragon IP-enabled user station (P2-USTIP1/2): Front rackmount of a Paragon user station • IP-enabled user-station module x 1 • 6-ft. (1.8-m) AC power cord x 1 • 16.4-ft. (5-m) DB9 male-to-female serial administration cable x 1 QS Rule Rack Mount Paragon II user stations and most KVM switches can be mounted in 1U (1.75", 4.4 cm) of vertical space in a standard 19" equipment rack, except that P2-UMT1664M switch shall be mounted in 2U (3.5", 8.9 cm) of space. To rack-mount a Paragon switch, use the brackets and screws that came with the device. To rack-mount a user station, use Raritan's RUST-LM304 rackmount kit. You can mount a Paragon switch or user station facing the front of the rack or facing the rear. Rear Mount Note: If you lose or damage a switch's brackets, replace them The steps correspond to the numbers shown in the rear with the RUMT-1U-LM304 kit for any 1U switch or rackmount diagrams. RUMT-2U-LM304 for a P2-UMT1664M. 1. Secure the cable-support bar to the front end of the side brackets, near the side brackets' “ears,” using two of the Forward Mount included screws. The steps correspond to the numbers shown in the front 2. Slide the user station or KVM switch between the side rackmount diagrams. brackets, with its rear panel facing the cable-support bar, until its front panel is flush with the back edges of the side 1. Secure the cable-support bar to the back end of the side brackets. brackets using two of the included screws. 3. Secure the user station or switch to the side brackets using 2. Slide the user station or KVM switch between the side the remaining included screws (three on each side). brackets, with its rear panel facing the cable-support bar, 4. Mount the entire assembly in your rack and secure the side until its front panel is flush with the “ears” of the side brackets' ears to the rack's front rails with your own screws, brackets. bolts, cage nuts, and so on. 3. Secure the user station or switch to the side brackets using 5. When connecting cables to the rear panel of the user the remaining included screws (three on each side). station or switch, drape them over the cable-support bar. 4. Mount the entire assembly in your rack and secure the side brackets' ears to the rack's front rails with your own screws, bolts, cage nuts, and so on. 5. When connecting cables to the rear panel of the user station or switch, drape them over the cable-support bar. Paragon II QSG 2 QSG-P2-0K-v4.6-E y 255-30-6010-00 To connect one or more Stacking Units Rear rackmount of a Paragon switch 1. Connect the power cord to the Main Unit. 2. Connect the power cord to the Stacking Unit. 3. Depending on the Stacking Unit you purchased, use one or two stacking cables to connect the Stacking Unit to the Main Unit. a. For connecting P2-UMT832S to P2-UMT832M: Plug one end of a stacking cable into the port—Expansion Port Out—on the Stacking Unit. Plug the other end of the cable into the port—Expansion Port—on the Main Unit. Rear rackmount of a user station b. For connecting P2-UMT1664S to P2-UMT1664M: Plug one end of the stacking cable into "Expansion Port Out A" on the Stacking Unit and the other end of the cable into the lower "Expansion Port In" on the Main Unit. Plug one end of the other stacking cable into "Expansion Port Out B" on the Stacking Unit and the other end of the cable into the upper "Expansion QS Rule Port In" on the Main Unit. Basic Installation 4. (Optional) You can cascade up to three P2-UMT832S Ensure that you have turned OFF all servers and Paragon II Stacking Units for a P2-UMT832M Main Unit. To add more devices prior to installation. Installing a basic Paragon II system Stacking Units, follow this procedure: involves these steps. a. Plug one end of a stacking cable into the port—Expansion Port In—on the last Stacking Unit Step (A): Connect Stacking Units to a Main Unit connected to the Main Unit. (Optional) b. Plug the other end of the cable into the port—Expansion Step (B): Connect User Stations to the Main Unit Port Out—on the newly added Stacking Unit. Step (C): Connect Servers to Paragon II Main and Stacking Units c. Connect a power cord to the newly added Stacking Unit. d. Repeat Steps a to c if you want to add one more Note: Users and servers can be located up to 1000 feet (304 m) Stacking Unit. apart. However, try to limit the cable length between the CIM 5. Turn on all Paragon II devices. and Paragon II switch to less than 100 feet (30.5 m) for optimal video quality, and if possible, limit the total cable length 6. Set the total number of connected Stacking Units on the between the user and target server to less than 500 feet (152 m) front panel of the Main Unit. for good video quality. a. Press the FUNC button to activate the Function Menu. b. Press the and buttons to select "Stacking Support." Step (A): Connect Stacking Units c. Press the ENT button to confirm your selection. If your Main Unit supports the use of Stacking Units, such as d. Press the and buttons to select the total number of P2-UMT832M, you can connect compatible Stacking Units to Stacking Units—3 maximum for P2-UMT832M or 1 expand the number of channel ports in the system. maximum for P2-UMT1664M. e. Press the ENT button to save the setting. Paragon II QSG 3 QSG-P2-0K-v4.6-E y 255-30-6010-00 7. Set a unique Stacking Unit ID on the front panel of each Note: P2-EUST/C provides USB ports only for keyboard Stacking Unit. and mouse. a. Press the FUNC button to activate the Function Menu. 4. Turn on the monitor. b. Press the and buttons to select "Set Stack ID." 5. Repeat Steps 1 to 4 for all other user stations you want to c. Press the ENT button to confirm your selection. connect to remaining User Ports. d. Press the and buttons to assign the numeric ID. The guideline of ID assignment is: The user station does not support the use of a VGA-to-DVI Assign 1 as the ID for the first Stacking Unit, which is converter. directly connected the Main Unit. Assign 2 as the ID for the second Stacking Unit, which is connected to the first Stacking Unit. Step (C): Connect Servers Assign 3 as the ID for the third Stacking Unit, which To connect one or more servers is connected to the second Stacking Unit. 1. Connect a Paragon II CIM to the Main or Stacking Unit. e. Press the ENT button to save the setting. a. Plug one end of a Cat5 UTP cable into Channel Port 8. Turn OFF all Paragon II devices. number 1 on the back of the Main Unit or any connected 9. Turn on the Stacking Unit first. If there are multiple Stacking Stacking Unit. Units, turn on the Stacking Units from the last one to the first b. Plug the other end of the cable into the RJ45 port of the one in sequence. CIM. 10. Turn on the Main Unit. Step (B): Connect User Stations To connect one or more user stations 1. Connect a user station to the Main Unit. a. Plug one end of a Cat5 UTP cable into User Port 2. Depending on the CIM model you purchased, plug the number 1 on the back of the Main Unit. connectors of the CIM into a server's PS/2 or USB keyboard, b. Plug the other end of the cable into the RJ45 port on the mouse, and VGA ports. back of the user station. 2. Connect a power cord to the user station and turn it on. Tip: If the server provides a DVI-D connector instead of a 3. Connect a PS/2 or USB keyboard, mouse, and a VGA VGA port, Raritan recommends that you connect the CIM monitor to the user station. to the server using a Smart View DVI-to-VGA (female to female) converter (DV-101). Note that currently only the Smart View DVI-to-VGA converter has been tested and is officially supported by Raritan for use with Paragon II. 3. Turn on the server. 4. Repeat Steps 1 to 3 for all other servers you want to connect to remaining Channel Ports. QS Rule Paragon II QSG 4 QSG-P2-0K-v4.6-E y 255-30-6010-00 Initial Verification 7. Press the Scroll Lock key twice QUICKLY to activate the OSUI, and do one of the following: To verify that the server connected to the Paragon To choose another green channel for verification, repeat system can be operated: Step 5. 1. Turn on all devices in the Paragon II system. To log out of the system, press F9. 2. The Login screen of the On-Screen User Interface (OSUI) is QS Rule displayed on the monitor connected to the user station. Video Gain Adjustment A video-gain adjustment is available to focus the video image, which can be especially useful if you are using an LCD flat-panel monitor. Please note that you must access each channel individually to adjust that channel's video gain. To make the video-gain adjustment 1. Press the hot key (default: Scroll Lock) twice QUICKLY to activate the Selection Menu. 3. Type your user name and password in the appropriate 2. Press the + and - (plus- and minus-sign) keys on the fields and press Enter. For example, if you are the keypad of your keyboard to adjust the video image until it administrator: appears to be in focus. a. Type admin in the User Name field and press Enter. For P2-UST, the video-gain range is -15 to +15. b. Type raritan (the default password; all lowercase) in the Password field and press Enter. Note the password is case-sensitive. For P2-EUST or P2-EUST/C, the video-gain setting is Tip: You can also type any user name for regular users. named "AGC," and its range is 0 to +6. The factory-default user names for regular users are user01 through up to user15, depending on the model of your Main Unit. By default, there are no passwords for these user names. 3. Press Esc or Enter to quit the OSUI and save the video setting. 4. The Selection Menu appears. 4. To adjust another channel's video-gain setting, access it and then repeat Steps 1 to 3. QS Rule Multi-Platform CIM Table PS/2 CIMs CIM model PS/2 VGA Local connector connector ports P2CIM-APS2 HD15 V P2CIM-APS2DUAL HD15 V P2CIM-APS2-B HD15 V Channels connecting to servers appear in green. At first UKVMC HD15 V V there are no names for any servers so all Name fields are blank. USB CIMs Note: The only exception is IBM BladeCenter chassis. Paragon II shows a default name “IBM-Blade” for the CIM model USB VGA Local device. connector connector ports P2CIM-AUSB* HD15 V 5. Press or on the keyboard to move the highlight to one of the green channels and press Enter. P2CIM-AUSBDUAL* HD15 V 6. Now you can view and control the chosen server with the keyboard and mouse. P2CIM-AUSB-B HD15 V Paragon II QSG 5 QSG-P2-0K-v4.6-E y 255-30-6010-00 CIM model USB VGA Local CIM model Automatic Support Support connector connector ports skew for IBM for card compensation Blade reader P2CIM-AUSB-C* HD15 V servers * These USB CIMs also support Sun servers via the SUN USB P2CIM-ASUN V ports. QS Rule Serial CIMs Additional Information For more information about the Paragon II and the entire CIM model Serial VGA Local Raritan product line, see Raritan's website (www.raritan.com). (RS-232) connector ports For technical issues, contact Raritan Technical Support. See connector the Contact Support page in the Support section on Raritan's website for technical support contact information worldwide. P2CIM-SER V HD15 P2CIM-SER-EU V HD15 AUATC V HD15 V P2CIM-PWR V HD15 (for the power strip) SUN CIMs CIM model SUN MINI VGA Local DIN8 connector ports connector P2CIM-ASUN V HD15 USKVMC V 13w3/ V HD15 CIMs with Special Functions CIM model Automatic Support Support skew for IBM for card compensation Blade reader servers P2CIM-APS2 V P2CIM-APS2D V UAL P2CIM-APS2-B V V P2CIM-AUSB V P2CIM-AUSBD V UAL P2CIM-AUSB-B V V P2CIM-AUSB-C V V Paragon II QSG 6 QSG-P2-0K-v4.6-E y 255-30-6010-00
Frequently asked questions
What makes Elite.Parts unique?

What kind of warranty will the RUMT-1U-LM304 have?
Which carriers does Elite.Parts work with?
Will Elite.Parts sell to me even though I live outside the USA?
I have a preferred payment method. Will Elite.Parts accept it?
Why buy from GID?

Quality
We are industry veterans who take pride in our work

Protection
Avoid the dangers of risky trading in the gray market

Access
Our network of suppliers is ready and at your disposal

Savings
Maintain legacy systems to prevent costly downtime

Speed
Time is of the essence, and we are respectful of yours
Related Products
Request a Quote

The quote request has been received
Close

Facing challenges or have inquiries? Feel free to contact us!
Call Us +1-469-283-2440
What they say about us
FANTASTIC RESOURCE
One of our top priorities is maintaining our business with precision, and we are constantly looking for affiliates that can help us achieve our goal. With the aid of GID Industrial, our obsolete product management has never been more efficient. They have been a great resource to our company, and have quickly become a go-to supplier on our list!
Bucher Emhart Glass
EXCELLENT SERVICE
With our strict fundamentals and high expectations, we were surprised when we came across GID Industrial and their competitive pricing. When we approached them with our issue, they were incredibly confident in being able to provide us with a seamless solution at the best price for us. GID Industrial quickly understood our needs and provided us with excellent service, as well as fully tested product to ensure what we received would be the right fit for our company.
Fuji
HARD TO FIND A BETTER PROVIDER
Our company provides services to aid in the manufacture of technological products, such as semiconductors and flat panel displays, and often searching for distributors of obsolete product we require can waste time and money. Finding GID Industrial proved to be a great asset to our company, with cost effective solutions and superior knowledge on all of their materials, it’d be hard to find a better provider of obsolete or hard to find products.
Applied Materials
CONSISTENTLY DELIVERS QUALITY SOLUTIONS
Over the years, the equipment used in our company becomes discontinued, but they’re still of great use to us and our customers. Once these products are no longer available through the manufacturer, finding a reliable, quick supplier is a necessity, and luckily for us, GID Industrial has provided the most trustworthy, quality solutions to our obsolete component needs.
Nidec Vamco
TERRIFIC RESOURCE
This company has been a terrific help to us (I work for Trican Well Service) in sourcing the Micron Ram Memory we needed for our Siemens computers. Great service! And great pricing! I know when the product is shipping and when it will arrive, all the way through the ordering process.
Trican Well Service
GO TO SOURCE
When I can't find an obsolete part, I first call GID and they'll come up with my parts every time. Great customer service and follow up as well. Scott emails me from time to time to touch base and see if we're having trouble finding something.....which is often with our 25 yr old equipment.
ConAgra Foods