

 Manufacturers
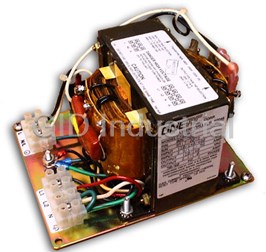
ONEAC 006-706
Description
Oneac 006-706 Power Conditioner Chassis. 250VA | 120-480IN | 120/240OUT
Part Number
006-706
Price
Request Quote
Manufacturer
ONEAC
Lead Time
Request Quote
Category
PRODUCTS - 0
Features
- Bi-directional filtering of high frequency conducted noise: assures reliable operation and prevents “noisy” loads from affecting sensitive electronics in the distribution system.
- Low impedance technology: optimal interface with switching power supplies—handling high crest factors and inrush currents without oversizing.
- Tight surge let-through: assures that conducted transient voltages won’t damage equipment or compromise accuracy.
- Voltage conversion: accepting input voltages of 480 V and providing 120 V output.
Datasheet

Extracted Text
Power Conditioner CX Series Power Conditioners 2 to 9.6 KVA Important Safety Instructions Save these Instructions -- This manual contains important instructions for the CX Series power conditioners, which should be followed during the unpacking, installation, and maintenance of this product. Model Number Part Number Serial Number ©2001 ONEAC Corporation 913-483 Rev - 1 Table of Contents 1.0 Introduction.................................................................................................................3 1.1 What Equipment Needs Power Conditioning? ............................................................3 1.2 Sizing Information .......................................................................................................3 2.0 Installation ..................................................................................................................4 2.1 Installation Overview...................................................................................................4 2.2 Unpacking and Placement............................................................................................5 2.3 Input Connections ........................................................................................................5 2.4 Output Connections .....................................................................................................6 2.5 Verifying Your Installation..........................................................................................7 3.0 Maintenance ................................................................................................................8 3.1 Fuse Replacement ........................................................................................................9 4.0 Troubleshooting an Installation ...............................................................................11 5.0 Warranty ....................................................................................................................12 All specifications and ONEAC part numbers subject to change without notice. Product names are copyright and registered trademarks/tradenames of their respective owners. 913-483 Rev - 2 1.0 INTRODUCTION Congratulations on owning the world’s finest and most reliable power conditioner. Your ONEAC POWER CONDITIONER provides the ultimate in power conditioning and offers your system an electrically clean, quiet and stable environment. With your ONEAC power conditioner, optimum system reliability and productivity can be realized through the unit’s ability to attenuate external impulses and de- couple noisy system loads. The excellent noise and transient attenuation coupled with low impedance benefits and excellent efficiency makes the ONEAC power conditioner cost efficient, system compatible and ideally suited for your system. This user manual contains important information about the proper operation, unpacking and installation of your ONEAC power conditioner. Please read this manual before attempting to unpack your power conditioner any further. If you have any questions or problems regarding your Power Conditioner, please contact ONEAC’s Technical Services. ONEAC offers 24 hour technical support. You can reach technical services at 1-800- 327-8801 then select option # 3 or at 1-847-816-6000 extension 3. 1.1 WHAT EQUIPMENT NEEDS POWER CONDITIONING? Only your electronic based equipment requires conditioned power. Fans, air conditioners and motors do not require power conditioning. Placing fans, air conditioners, motors or other noise generators between the conditioner and the electronics introduces electrical interference into the already conditioned power. In order to minimize electrical noise, each piece of equipment should be individually wired back to the output of the ONEAC power conditioner. 1.2 SIZING INFORMATION The rating label of your ONEAC power conditioner lists the model’s current rating, nominal input and output voltage and serial number. The combined steady state RMS current draw of all your equipment must not exceed the power conditioner’s output current rating. 913-483 Rev - 3 2.0 INSTALLATION 2.1 INSTALLATION OVERVIEW Please Note! Only qualified electricians should install an ONEAC POWER CONDITIONER. Follow the U.S. National Electrical Code®, local codes, good wiring practice and this User Manual. For Plate Versions: CX Plate mounted models are UL/cUL Recognized components, intended for installation in enclosures. Please see the installation instructions included in the packaging of your plate version power conditioner. For Enclosure Versions: CX Enclosures mounted models are UL/cUL Listed products. Please see the installation label that is affixed to the inside of the door of the enclosure. This POWER CONDITIONER contains DANGEROUS VOLTAGES. Accidental contact can result in serious electrical shock. WARNING Always follow the U.S. National Electrical Code® or your local electrical codes and good wiring practice. Dieses Leistungsanpassungsgerät führt lebensgefährliche Spannung. Stromschlaggefahr! Bitte beachten Sie die in Ihrem Land WARNUNG geltenden Vorschriften über die Verdrahtung und Beschaltung. The input requires two phase conductors and a ground conductor connection. The use of rigid or flexible steel conduit is strongly preferred for these hardwire models. Physically separate the input power connections to the power conditioner from the equipment power connections on the output. Data cables should be kept as far away as possible from any power cables. For MAXIMUM PERFORMANCE, Use steel wall conduit or flexible steel conduit with a continuous copper ground between your equipment and the power conditioner. Always include a ground wire for each circuit on the output of the power conditioner. Do not use extension cords or power strips. Do not connect your equipment to the power conditioner’s output until the input connections have been made and proper power conditioner operation has been verified. 913-483 Rev - 4 2.2 UNPACKING AND PLACEMENT Upon arrival, inspect the unit and the shipping package for signs of damage. If damage is detected, immediately contact the freight company and ONEAC Technical Services. You can reach ONEAC Technical Services at 1-800-327-8801 then select option # 3 or at (847) 816-6000 extension 3. ONEAC recommends that your power conditioner be left in its shipping package during handling. Remove the conditioner from the shipping package once it is as close as possible to its final installation location. The actual physical placement of the power conditioner should be as close as possible to your equipment. The power conditioner should be installed inside the room containing your equipment. 2.3 INPUT CONNECTIONS Turn off the main power source supplying the power conditioner at the service disconnect before proceeding. WARNING Vor dem nächsten Arbeitsschritt muß die Hauptnetzversorgung WARNUNG zum Leistungsanpassungsgerät am Wartungstrennschalter abgeschaltet werden 1. Follow the U.S. National Electrical Code® and your local electrical codes. 2. Remove the cover or open the door of the unit. 3. Locate and punch out the input conduit hole making sure to physically separate the input service wiring from the output equipment wiring. Keep all wiring away from the transformer and use wire rated to a minimum of 75°C. 4. Connect the input ground to the terminal block (G). Heavy gauge wire, equal to or larger in diameter than the current carrying conductors should be used to connect the safety ground. It is recommended that ground be wired back to the service ground. NOTE: Do not rely on the conduit alone for connection to ground. ONEAC discourages the down sizing of grounding conductors as allowed by various codes. If in doubt regarding wire sizing, consult the U.S. National Electrical Code®, Table 310-16, or your local electrical codes. 5. Connect the input phase wires to the disconnect switch (Enclosure models) or the input fuse block (Plate models). 6. Torque all connections. Refer to the torque specifications in Section 3.0, “Maintenance”. 7. Proceed to Section 2.4, “Output Connections”. Input Overcurrent Protection All CX Series power conditioners are provided with input fuses. Refer to Section 3.1, “Fuse Replacement” for details on fuse replacement. 913-483 Rev - 5 2.4 OUTPUT CONNECTIONS Turn off the power source supplying the power conditioner WARNING at the service disconnect before proceeding. Vor dem nächsten Arbeitsschritt muß die Stromversorgung WARNUNG zum Leistungsanpassungsgerät am Wartungstrennschalter abgeschaltet werden. 1. Follow the procedure for connecting the input connections, see Section 2.3, “Input Connections”. 2. Follow the U.S. National Electrical Code® and your local electrical codes. 3. Each power run should be unique to each piece of equipment in the system. The use of temporary power taps should be avoided. Even the use of duplex receptacles should be avoided in the case of electrically noisy loads. (i.e. laser printers, phase regulated power supplies, etc.). Data cables should be kept as far away from any power cables as possible. 4. ONEAC recommends that power runs on the output of the conditioner be as short as possible, with a maximum length of 50 feet (15 m). Separate the input wiring to the ONEAC power conditioner from the output equipment wiring. 5. Use wire sizes as recommended by the U.S. National Electrical Code for lengths up to 25 feet (7.6m). 6. Locate and punch out all output conduit holes making sure to physically separate the input service wiring from the output equipment wiring. Keep all wiring away from the transformer and use wire rated to a minimum of 75°C. NOTE: The use of rigid or flexible steel conduit with a continuous copper ground will limit any outside interference and help to insure proper system performance. 7. Connect the output ground to the output terminal block (G). Heavy gauge wire, equal to or larger in diameter than the current carrying conductors should be used to connect the safety ground. Always include a ground wire for each output circuit. 8. Do not rely on the conduit alone for connection to ground. ONEAC discourages the down sizing of grounding conductors as allowed by various codes. If in doubt regarding wire size, consult the U.S. National Electrical Code ®, Table 310-16, or your local electrical codes. 9. Connect the output phase wires to the output terminal block or circuit breakers. 10. Torque all connections. Refer to the torque specifications in Section 3.0 “Maintenance”. 11. Follow the procedure in Section 2.5 “Verifying Your Installation”. 12. Replace the unit cover or close the door. Output Overcurrent Protection Output fuses or circuit breakers are used to protect each individual output circuit. Refer to Section 3.1 “Fuse Replacement” for details on fuse replacement. 913-483 Rev - 6 2.5 VERIFYING YOUR INSTALLATION 1. Verify that the installation follows the guidelines outlined in Section 2.0, “Installation Overview”. 2. Verify that the door to the enclosure is securely closed and the disconnect switch is in the ON position. DANGEROUS VOLTAGES ARE PRESENT. CAUTION STROMFüHREND. EBENSGEFAHR! VORSICHT 3. Turn ON the main power source. 4. Use a voltmeter to determine if voltage is present at the input and output. The ONEAC power conditioner’s output voltage may run a few volts higher than the rating voltage until the load is switched on. 5. If the operating voltage matches that suggested by the equipment manufacturer, turn off the power conditioner and plug in the output equipment. Operate output equipment as usual. If variations in the operating voltages of the power conditioner are greater than manufacturer’s specifications, see Section 4.0, “Troubleshooting an Installation”. 913-483 Rev - 7 3.0 MAINTENANCE Maintaining the correct operation of your ONEAC Power Conditioner is limited to annually checking the operating voltage and torquing all the connections. Turn off the input and main output circuit breakers on the power WARNING conditioner. Turn off the power source supplying the power conditioner at the service disconnect before proceeding. Die Eingangs- und Hauptausgangs-Leistungsschutzschalter am WARNUNG Leistungsanpassungsgerät abschalten. Vor dem nächsten Arbeitsschritt muß die Stromversorgung zum Leistungsanpassungsgerät am Wartungstrennschalter abgeschaltet werden. Torque Specifications Terminal and Fuse Block lug torque specifications - on terminal or fuse block label. Location Bolt Material Torque example Size (ft/lb) (in/lb) (Nm) Transformer Mounting 3/8 Steel 20 240 27 Wires 5/16 Steel 12 140 16.3 1/4 Steel 6 75 8.1 Misc. Conn. #10 Steel 32 3.6 #8 Steel 20 2.3 #6 Steel 11 1.2 3/8 Brass 20 240 27 5/16 Brass 11 132 14.9 1/4 Brass 6 75 8.1 #10 Brass 20 2.3 #8 Brass 16 1.8 #6 Brass 8 0.9 3.1 FUSE REPLACEMENT Fuses are used to protect the primary, and for some CX units, the secondary of the main transformer. The primary fuses are energized whenever the power source supplying the power conditioner is turned ON. All fuses are located by removing the cover or opening the door to the power conditioner. Fuse Replacement 1. Turn OFF the main power source supplying the power to the conditioner. 913-483 Rev - 8 2. Turn OFF the power conditioner’s disconnect switch. Turn off the input and main output circuit breakers on the WARNING power conditioner. Turn off the power source supplying the power conditioner at the service disconnect before proceeding. Die Eingangs- und Hauptausgangs-Leistungsschutzschalter am WARNUNG Leistungsanpassungsgerät abschalten. Vor dem nächsten Arbeitsschritt muß die Stromversorgung zum Leistungsanpassungsgerät am Wartungstrennschalter abgeschaltet werden. 3. Remove the cover or open the door to the power conditioner. Locate and test each fuse (input and output) with an ohmmeter to verify proper working order. Replace any fuse that is “open” or inoperable with one of those in the list below for the particular CX model, fuse function and current rating. Current ratings are marked near each fuse in the power conditioner as well as on the fuse being replaced 4. Replace the cover or close the door to the power conditioner. 5. Follow the procedure in Section 2.1, “Verifying Your Installation”. Input Fuses: Rated 600Vac CX Model Fuse Rating Manufacturer and Part No. Amps Class Bussmann Littelfuse Ferraz Shawmut CX2120 15 CC LP-CC-15 CCMR-15 ATDR15 CX2136 20 CC LP-CC-20 CCMR-20 ATDR-20 CX2150 30 CC LP-CC-30 CCMR-30 ATDR30 CX2172 50 RK5 FRS-R-50 FLSR50 TSR50R CX2196 60 RK5 FRS-R-60 FLSR60 TSR60R CX4120 8 CC LP-CC-8 CCMR-8 ATDR8 CX4136 10 CC LP-CC-10 CCMR-10 ATDR10 CX4150 15 CC LP-CC-15 CCMR-15 ATDR15 “ 20 CC LP-CC-20 CCMR-20 ATDR20 CX4172 30 RK5 FRS-R-30 FLSR30 TSR30R CX4196 40 RK5 FRS-R-40 FLSR40 TSR40R Output Fuses: Rated 240 Vac CX Model Fuse Rating Bussman Little Fuse Gould Shawmut (Amp) Various 15 FNW15 FLM15 Various 20 FNW20 FLM20 Various 25 FNW25 FLM25 Various 30 FNW30 FLM30 CX2172,CX4172 80 FRN-R-80 FLNR80 TR80R CX2196,CX4196 100 FRN-R-100 FLNR100 TR100R 913-483 Rev - 9 4.0 TROUBLESHOOTING AN INSTALLATION If there is power at the input with no power at the output, turn OFF the main power source, then turn OFF the disconnect switch specific to the unit in question. Remove the cover or open the door and check the values specified on the nameplate. Verify that your main power source is correct for the power conditioner’s input voltage. Verify that the power conditioner’s input voltage has not been changed in the field. If everything seems correct, disconnect the line and ground the input wires and then contact your local ONEAC Sales Representative or ONEAC Technical Services Department. The ONEAC Technical Services Department offers 24 hour technical support and can be reached at 1- 800-327-8801, then select option # 3 or at (847) 816-6000 extension 3. If your ONEAC power conditioner needs repair or replacement which cannot be done on site, ONEAC’s Technical Services will issue you a Return Material Authorization (RMA) number along with instructions on how to return the conditioner. Please check with ONEAC’s Technical Services Department before attempting to repair or return any ONEAC product. Correspondence and RMA’s should be directed to: ONEAC Technical Services 27944 North Bradley Road Libertyville, IL 60048-9700 U.S.A. Attention: RMA # 913-483 Rev - 10 5.0 WARRANTY ONEAC warrants its products to be free from defects in materials and workmanship for a period of five years. This warranty is limited to repairing or replacing, at ONEAC’s option, any defective component, circuit board or module contained within the product only when it is returned with an ONEAC Return Material Authorization (RMA) number to ONEAC or to an ONEAC-designated repair facility. In all cases, shipping charges to and from ONEAC or the ONEAC-designated repair facility are at the customer’s expense. Certain modules or peripherals included with the product but not manufactured by ONEAC, including but not limited to batteries or battery packs, are warranted for ninety days or to the extent of the manufacturer’s warranty, whichever is longer. Limitations of Warranty -This limited warranty does not cover any losses or damage resulting from shipment to or from the customer, or from improper installation, environment or abuse, or from any modifications, adjustments or repair by other than ONEAC-authorized personnel. Exclusive Remedies - Except as set forth herein and except as to title, there are no warranties, express or implied, or any affirmations of fact or promises by ONEAC with reference to the products or their merchantability or fitness for any particular purpose. In no event shall ONEAC be liable for lost profits, goodwill or any other special or consequential damages. If it becomes necessary to return a power conditioner, contact ONEAC for a Return Material Authorization (RMA) number. This number must be marked on the shipping carton and packing slip of the unit being returned. Shipping charges are to be borne by the customer. Customers will be billed repair charges for shipping damages resulting from inadequate packaging of the product being returned. ONEAC USA 27944 North Bradley Road Libertyville, IL. 60048-9700 USA Telephone: 847-816-6000 Toll Free: 800-327-8801 Fax: 847-680-5124 913-483 Rev - 11
Frequently asked questions
What makes Elite.Parts unique?

What kind of warranty will the 006-706 have?
Which carriers does Elite.Parts work with?
Will Elite.Parts sell to me even though I live outside the USA?
I have a preferred payment method. Will Elite.Parts accept it?


What they say about us
FANTASTIC RESOURCE
One of our top priorities is maintaining our business with precision, and we are constantly looking for affiliates that can help us achieve our goal. With the aid of GID Industrial, our obsolete product management has never been more efficient. They have been a great resource to our company, and have quickly become a go-to supplier on our list!
Bucher Emhart Glass
EXCELLENT SERVICE
With our strict fundamentals and high expectations, we were surprised when we came across GID Industrial and their competitive pricing. When we approached them with our issue, they were incredibly confident in being able to provide us with a seamless solution at the best price for us. GID Industrial quickly understood our needs and provided us with excellent service, as well as fully tested product to ensure what we received would be the right fit for our company.
Fuji
HARD TO FIND A BETTER PROVIDER
Our company provides services to aid in the manufacture of technological products, such as semiconductors and flat panel displays, and often searching for distributors of obsolete product we require can waste time and money. Finding GID Industrial proved to be a great asset to our company, with cost effective solutions and superior knowledge on all of their materials, it’d be hard to find a better provider of obsolete or hard to find products.
Applied Materials
CONSISTENTLY DELIVERS QUALITY SOLUTIONS
Over the years, the equipment used in our company becomes discontinued, but they’re still of great use to us and our customers. Once these products are no longer available through the manufacturer, finding a reliable, quick supplier is a necessity, and luckily for us, GID Industrial has provided the most trustworthy, quality solutions to our obsolete component needs.
Nidec Vamco
TERRIFIC RESOURCE
This company has been a terrific help to us (I work for Trican Well Service) in sourcing the Micron Ram Memory we needed for our Siemens computers. Great service! And great pricing! I know when the product is shipping and when it will arrive, all the way through the ordering process.
Trican Well Service
GO TO SOURCE
When I can't find an obsolete part, I first call GID and they'll come up with my parts every time. Great customer service and follow up as well. Scott emails me from time to time to touch base and see if we're having trouble finding something.....which is often with our 25 yr old equipment.
ConAgra Foods